Emma Fontanella’s One Pot Mac and Cheese
About My One Pot Mac And Cheese
I’m very proud of this homemade mac and cheese recipe. It’s super easy, and super quick. The whole dish comes together from scratch in 10 minutes. It’s also all made in one pot so there’s almost no cleanup. I really think it might be the best mac and cheese you’ll ever have—it’s like a Kraft Dinner, but better!
It’s also a great recipe for personalizing. Because of the techniques we’ll be using, you can use whatever cheese you like in this recipe, and it will still work. That means you can use your favorite cheeses, or you can use any leftover pieces of cheese you might have lying around in your fridge that need using up.
For some inspiration for other cheeses to try using this mac and cheese recipe, see the sections below called, “What cheeses make the best mac and cheese?” and “What's the best melting cheese?”. For some ideas on personalizing the dish with other flavors like mustard, hot sauce, and more, see the section, “Variations”.
This Mac and Cheese recipe comes from my new cookbook, Simple Pleasures. In there you’ll also find other easy, comforting and delicious dinners, such as “One-Pan Oven Spaghetti”, “Three Ingredient Fettucine Alfredo”, “Ultimate Easy Lasagna” and one that’s really personal to me, my “Dad’s Potato-Cheese Pie”.
Why Does This Recipe Work?
There are a few things in the techniques we’re using in this recipe that differ from the usual way of making mac and cheese.
Maximizing Starch Retention
The first thing we do is ensure we keep all the starch that’s released from the macaroni while it’s cooking. So, we’re using the minimal amount of water needed to cook the pasta. (You’ll notice I specify the precise volume of water to use in the recipe.) That’s because we don’t want to drain any starchy water away from the pasta. Instead, we want to retain and concentrate every, single last bit of starch that’s released from the macaroni.
The reason for doing this is that we want to use the starch to help emulsify the cheese sauce. If you’ve ever made the trendy Roman pasta dish, “cacio e pepe”, you’ll be familiar with this idea. In this recipe though, we turn that starch concentration dial all the way up to eleven! That’s because we want to be able to incorporate a lot of cheese into our mac and cheese!
The Mac and Cheese cheese sauce. The creamy, melty texture comes from emulsifying cheese and milk using starch released from the pasta during cooking, and from sodium citrate present as an ingredient in American cheese. Sodium citrate is known as a “melting salt” because of the way it makes cheese melt.
It’s also worth noting we’re boiling our pasta in water, not in milk. Many mac and cheese recipes call for boiling the pasta in milk (and cream), but I find this a pain. Boiling milk is often annoying because it can easily catch and burn on the bottom of the pan, which ruins the entire dish. Also, it has a tendency to foam up and boil over, making a mess everywhere! So, we’re boiling our pasta in water here!
American cheese and emulsifying salts
The second thing we do is to use a couple of slices of American cheese in our recipe. As long as you include the American cheese, you can use whatever other cheeses you want in this recipe, and it will work perfectly!
It’s not that we particularly want the cheese part of the American cheese. Rather, we want to use one of the other ingredients in American cheese — sodium citrate. (Popular brands of this kind of processed cheese slice around the world include Kraft Singles and Dairylea Slices.)
Sodium citrate (E331) is known as what’s called an “emulsifying salt”. It interacts with proteins in cheese such that, when a cheese melts, it emulsifies beautifully into watery liquids like milk. It’s the reason why American cheese slices melt so perfectly on cheeseburgers!
In this mac and cheese recipe, as we melt the American cheese into the milk, sodium citrate is released and interacts with all the other cheeses we’re using, causing them to emulsify into the sauce as they melt.
People have been using emulsifying salts to make melty cheese sauces before they anyone knew they even existed or what they did. For example, the core reason you add white wine to fondue is because the wine is a source of emulsifying salts.
The benefits of the starch and sodium citrate working together
Think of the starch and the sodium citrate as partners, working together to emulsify the melted cheese with the milk. This allow us to make the most flavorful, cheesiest cheese sauce ever!
The final thing that’s different about this mac and cheese recipe is something we don’t need to do. With this recipe, we don’t need to make a roux using butter and flour, and then make a béchamel sauce using milk and cream. Making béchamel takes time, and is prone to being lumpy! The “starch / sodium citrate” technique removes the need for it and makes life so much easier.
So, rather than rely on a béchamel sauce to create a creamy texture for our cheese sauce, all our amazing texture comes from silky, melted, cheese! It’s beyond delicious, and beyond flavorful!
Of course, if you want to some add butter and cream, go right ahead! It won’t hurt, and it’s delicious, but I don’t think you need it. This way, the dish isn’t as heavy as the traditional version. Sometimes, with traditional mac and cheese, I find myself getting full before I’ve finished it!
Can you use any pasta for mac and cheese?
Elbow macaroni is the classic pasta shape for mac and cheese. However, any short “tube” shape pasta works really well. Some options I love are: Cavatappi, Cellentani, Penne, and Rigatoni. It’s best to avoid long pasta shapes, like spaghetti, linguine, and fettuccine, because the those shapes won’t hold the thick sauce quite as well as the tube pasta.
What cheeses make the best mac and cheese?
Some of the best and most popular cheeses for mac and cheese are:
Cheddar
Monterey Jack
Pepper Jack
Parmesan
Gruyere
Brie
Smoked Gouda
Fontina
What's the best melting cheese?
If you’re looking to try out some different “melty” cheeses, here are some ideas.
Fontina
Provolone
Mozzarella
Gruyère
Gouda
Asiago
Taleggio
Reblochon
How do you keep mac and cheese creamy?
If you follow this recipe, your mac and cheese should stay super creamy. If, for some reason it doesn’t e.g., it’s cooled down too much, then it’s easy to fix. Warm up the mac and cheese again on the stove top, add a little milk or cream, and give it a good stir. Add milk and cream a tablespoon at a time and fully incorporate it to find the creamy texture you’re looking for.
Why isn't my homemade mac and cheese creamy?
If your Mac and cheese isn’t creamy and is too “dry”, here are the reasons why and how to fix it. As mac and cheese cooks and cools, the sauce will continue to thicken. This is due to the pasta absorbing more liquid over time, and the sauce itself becoming more “solid” as it cools. So, to ensure a creamy mac and cheese, make the sauce just a little looser than you think it needs to be. (Add more milk, a tablespoon at a time to adjust the consistency).
Why does my homemade Mac and cheese taste bland?
If your mac and cheese tastes bland, it’s either because it’s under-seasoned, you didn’t use flavorful cheese, or you didn’t use enough cheese. Try adding a little more salt first, because that might fix it. If the problem was the cheese you use doesn’t have much flavor, then try adding some other flavors, such has mustard or hot sauce. The next time you make it, try to find some more strongly flavor cheese, or adding more cheese.
Variations
Changing the cheese
The Cheddar cheese can be swapped out for any melty cheese you like. Similarly, you can swap out the Parmesan for any strongly flavored cheese you prefer. However, you must include the American cheese, which has ingredients that help keep the sauce creamy and emulsified.
In fact, as long as you follow the “American cheese” rule, you can use pretty much whatever cheeses you want. So feel free to experiment with your favorite cheeses! It’s also great for using up any and all leftover pieces of cheese you might have lying around in the fridge.
Textural variations
In the recipe, I stopped the mac and cheese at the point where there was a creamy cheese sauce. However, you don’t have to top there! If you want a “cheese pull” texture, add an extra handful (around 4oz or 100g) of your cheese mixture to the finished mac and cheese. Stir it in, cover, and allow to rest for 3 minutes.
If you want a baked mac and cheese, simple place the finished dish under the broiler for a few minutes, until the top is bubbling, and browned deliciously!
Spicing things up
Mac and cheese works fantastically well with additional flavourings. Sometimes I like to add mustard. Other times I like to add a little (not very!) hot sauce. Add as much or as little, according to your taste. I like to go easy on the hot stuff, but that’s just me!
To really kick up the flavors, I also love to make an Indian-inspired variation. Add ginger-garlic paste, chopped fresh chilies (de-seeded and in moderation, if you’re like me!), garam masala, and a little chili powder. It’s incredible!
INGREDIENTS
7oz (200g) dried cavatappi or elbow macaroni
½ tsp salt
2½ cups (600g) water
½ cup (120g) whole milk
3½oz (100g) Cheddar cheese
2 slices (40g) American cheese (or the equivalent melty, flexible, processed cheese slices available in your country. It just needs to be cheese with sodium citrate (E331) as an ingredient.)
¼ cup (30g) Parmesan cheese
INSTRUCTIONS
Prepare the cheeses
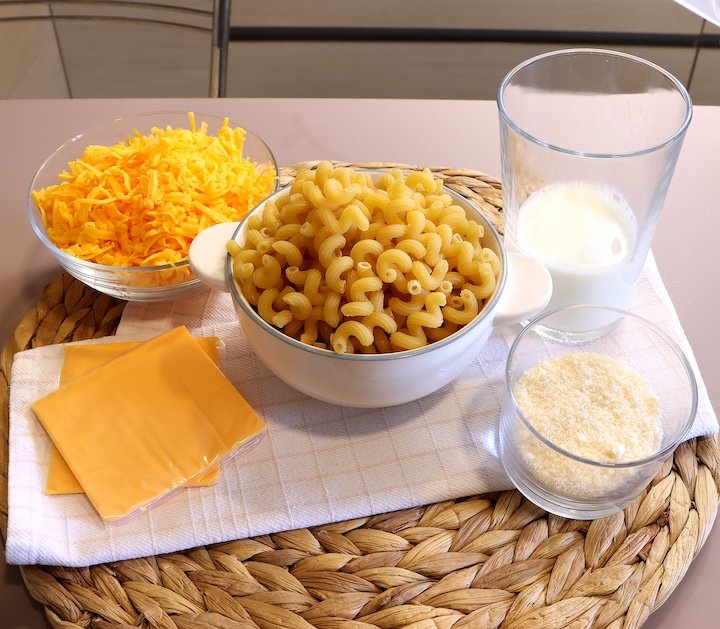
The ingredients for the mac and cheese laid out. Note the coarsely shredded Cheddar (in the top left), and the finely grated Parmesan (in the bottom right).
Grate the Cheddar and Parmesan cheese. Use a course grater for the Cheddar cheese, and a fine grater for the Parmesan. Tear or chop the American cheese slices into pieces
Boil the pasta
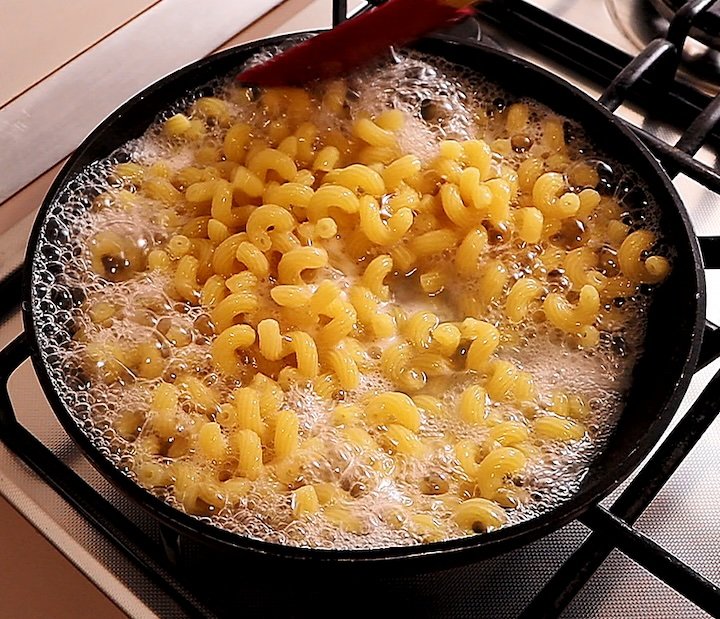
Boiling the pasta in a minimal amount of water. This allows us to collect all the starch released during cooking, because we don’t need to drain it.
In a large saucepan over medium-high heat, combine the pasta, salt, and water, which should be enough to just cover the pasta. You won't drain the macaroni, so don't add more water than necessary.) Stir continuously until the water comes to a boil.
This initial phase of cooking is where pasta releases most of its starch, so this is the time where it’s at most risk of sticking to the pan and to itself. So, keep stirring!
Once the mixture begins to boil, partially cover the saucepan with a lid. Cook for 6 to 7 minutes or until the water is almost completely absorbed and the macaroni is close to fully cooked, stirring every 30 to 40 seconds.
Once the pasta is cooked, there might be some water left in the pan. Remove the lid, increase the heat to high, and reduce the water until there's no more than ¼ inch (6mm) remaining. This won't take more than 1 to 2 minutes.
Add the milk and cheese
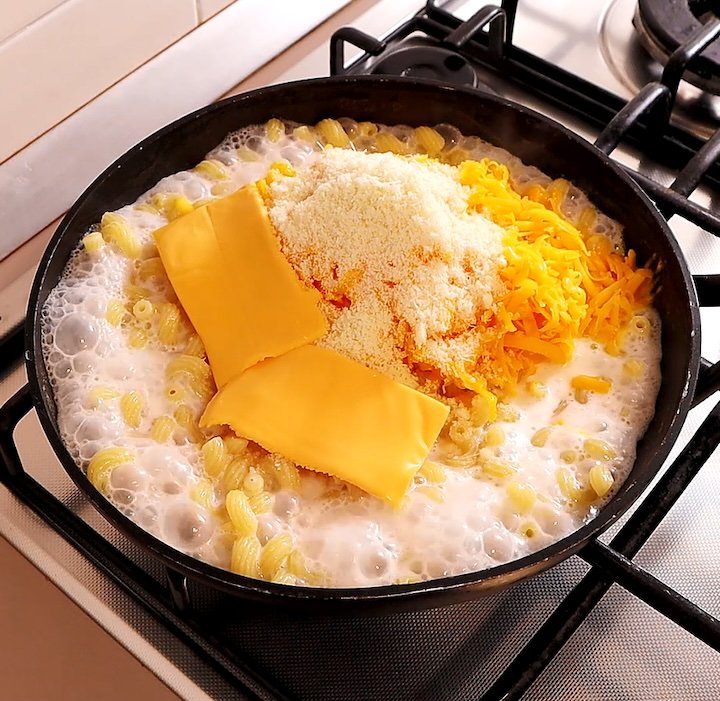
Adding the milk, Cheddar, Parmesan and American cheese.
With the burner still on high, add the milk and bring to a boil, stirring continuously. As soon as the milk begins to boil, add the Cheddar, American, and Parmesan cheeses.
Continue to cook until the sauce has reduced slightly. (Don't let it reduce too much or it will split.)
Starting to make the sauce. The cheese will quickly melt into the milk, and create an emulsified sauce. It then needs to be reduced slightly to the desired consistency.
Reduce the heat to low and mix well using a rubber spatula to scrape the bottom and sides of the pan until the cheese has fully melted and the sauce thickens slightly.
Turn off the heat. The sauce will continue to thicken as it cools.
Serve
The final mac and cheese
Taste and adjust the seasoning. Serve immediately. There are many way to pimp this recipe up! See the section “Variations” above, for some ideas, including adding mustard or hot sauce, and turning the dish into a baked mac and cheese.
Watch the video for more tips
Hi! I’m Emma Fontanella. Here you’ll find trusted, tested recipes to satisfy your baking addiction and carb cravings. Learn more…
Tried one of my recipes? Please let me know on Instagram (@emmafontanella) or TikTok (@emma.fontanella)! Hashtag #emmafontanella
Search for another recipe…


